
안녕하세요. 오늘은 우리가 잘 사용하는 ArrayList에 대해 코드를 들여다 보고 내부는 어떻게 구성되어 있는지 확인해보도록 하겠습니다. 그리고 주요한 메서드 들은 어떤 로직으로 구현되어 있는지 알아보도록 하겠습니다.
ArrayList
ArrayList는 배열을 좀 더 편하게 쓸수있도록 Java에서 제공해주는 Class입니다. 일반 배열과는 다르게 메모리가 가능한한 추가할 수 있고 삭제에 대해서도 해당 index를 비워두기만 하는게 아니라 재정렬해주는 기능을 기본으로 제공해주고 있습니다.
interface와 내부 변수 확인
public class ArrayList<E> extends AbstractList<E>
        implements List<E>, RandomAccess, Cloneable, java.io.Serializable
ArrayList는 AbstractList를 extends 받았고 List, RandomAccess, Cloneable, Serializable을 implements 받았습니다.
RandomAccess는 index를 통해 직접 바로 접근 할수 있는 자료구조라는 의미입니다.
그리고 아래가 ArrayList를 사용했을 때 실제로 데이터가 담기는 내부 변수입니다.
/**
* The array buffer into which the elements of the ArrayList are stored.
* The capacity of the ArrayList is the length of this array buffer. Any
* empty ArrayList with elementData == DEFAULTCAPACITY_EMPTY_ELEMENTDATA
* will be expanded to DEFAULT_CAPACITY when the first element is added.
*/
transient Object[] elementData; // non-private to simplify nested class access
그렇습니다. 여기서 우리는 ArrayList는 우리가 아는 일반적인 배열로 구현되어있다는 것을 알 수 있습니다. 그리고 주석을 보면 해당 배열의 크기는 우리가 처음 add를 할 때 정해진다고 써있습니다.
생성자
List<String> list = new ArrayList<>();ArrayList를 사용하고 싶으면 보통 우리는 위와같이 선언하고 사용합니다. 이렇게 선언했을때 ArrayList에서 일어나는 내부로직을 알아보도록 하겠습니다.
/**
* Constructs an empty list with an initial capacity of ten.
*/
public ArrayList() {
    this.elementData = DEFAULTCAPACITY_EMPTY_ELEMENTDATA;
}
일반적으로 사용하는 별도의 파라미터가 없는 생성자입니다. Array에 값을 대입하는걸 알 수 있습니다. DEFAULTCAPACITY_EMPTY_ELEMENTDATA의 값은 비어있는 Array값입니다. 즉, size 0의 Array가 만들어질 것입니다.
/**
* Constructs an empty list with the specified initial capacity.
*
* @param  initialCapacity  the initial capacity of the list
* @throws IllegalArgumentException if the specified initial capacity
*         is negative
*/
public ArrayList(int initialCapacity) {
    if (initialCapacity > 0) {
        this.elementData = new Object[initialCapacity];
    } else if (initialCapacity == 0) {
        this.elementData = EMPTY_ELEMENTDATA;
    } else {
        throw new IllegalArgumentException("Illegal Capacity: "+
                                            initialCapacity);
    }
}
instance를 생성할 때 생성자에 int형의 파라미터를 넘길 수 있습니다. 파라미터의 값에 따라서 바로 초기화 되는것을 알 수 있습니다.
add
#add(Object)는 ArrayList의 제일 마지막에 값을 하나 추가하는 method입니다. 중간에 삽입하고 싶으시다면 #add(index, Object)를 사용하시면 됩니다. #add(Object)를 코드로 한번 알아보도록 하겠습니다.
public boolean add(E e) {
    ensureCapacityInternal(size + 1);  // Increments modCount!!
    elementData[size++] = e;
    return true;
}
실제 코드를 실행했을 때 발생하는 로직입니다. 가장먼저 내부 Object[]배열의 크기를 재산정합니다. 그리고 해당배열에 값을 입력 후 size값을 증가 그리고 return합니다.
private void ensureCapacityInternal(int minCapacity{
    ensureExplicitCapacity(calculateCapacity(elementData, minCapacity));
}
현재 Object[] 배열과 size + 1 의 값을 이용하여 배열의 크기를 재산정(#calculateCapacity) 한 후 적용(#ensureExplicitCapacity)한다는 것을 알 수 있었습니다. 배열의 크기는 어떻게 재산정하는지 보도록 하겠습니다.
private static int calculateCapacity(Object[] elementData, int minCapacity) {
    if (elementData == DEFAULTCAPACITY_EMPTY_ELEMENTDATA) {
        return Math.max(DEFAULT_CAPACITY, minCapacity);
    }
    return minCapacity;
}
ArrayList가 현재 빈배열(초기화 상태)라고 하면 기본크기(DEFALUT_CAPACITY = 10)와 입력된 값 중 큰 값을 return하며 그게 아니라면 size + 1의 크기를 return합니다.
private void ensureExplicitCapacity(int minCapacity) {
    modCount++;

    // overflow-conscious code
    if (minCapacity - elementData.length > 0)
        grow(minCapacity);
}#calculateCapacity에서 return 받은 값을 minCapacity로 사용합니다. 그리고 해당 값이 Object[]의 크기보다 크다면 #grow라는 메서드를 호출하고 있습니다.
/**
* Increases the capacity to ensure that it can hold at least the
* number of elements specified by the minimum capacity argument.
*
* @param minCapacity the desired minimum capacity
*/
private void grow(int minCapacity) {
    // overflow-conscious code
    int oldCapacity = elementData.length;
    int newCapacity = oldCapacity + (oldCapacity >> 1);
    if (newCapacity - minCapacity < 0)
        newCapacity = minCapacity;
    if (newCapacity - MAX_ARRAY_SIZE > 0)
        newCapacity = hugeCapacity(minCapacity);
    // minCapacity is usually close to size, so this is a win:
    elementData = Arrays.copyOf(elementData, newCapacity);
}
로직을 보니 이 메서드가 실제로 배열의 크기를 재산정하고 기존(old)에 있던 정보를 새로운 배열(new)에 넣는 메서드입니다. 로직을 보면 newCapacity가 새로 만들어질 배열의 크기입니다. 이 값은 oldCapacity + (oldCapacity >> 1);입니다. 즉 기존 크기에서 50%의 크기를 더해서 새로운 크기를 산정하는 것입니다. 만약 해당크기가 minCapacity보다 작다면 minCapacity 값으로 재산정됩니다. 한번도 add하지 않았을때 10의 크기를 가지게 되는것입니다.
이런로직으로 ArrayList는 add 메서드가 호출될 때 크기를 재산정하고 실제 데이터가 들어가 있는 크기인 size index에 값을 넣은 후 size를 1증가 시킨후 return합니다.
- 위의 로직에 따라 크기를 재산정 할때는 원래크기만큼 새로운 배열에 복사를 해야하므로 시간복잡도 O(n)을 가지며 추가할 때 O(1)을 가지게 되는것을 알 수 있었습니다. 크기를 overflow하지 않아 재산정을 하지 않을때는 O(1), 재산정이 필요하면 O(n)으로 정의할 수 있을 것입니다.
remove
반대로 remove를 통해 들어있는 데이터를 제거하는 메서드를 한번 보도록 하겠습니다. remove는 E remove(int index)와 boolean remove(Object o)으로 index 기준으로 삭제와 value에 대한 삭제가 있습니다. 저희는 index기준의 삭제를 알아보도록 하겠습니다.
/**
     * Removes the element at the specified position in this list.
     * Shifts any subsequent elements to the left (subtracts one from their
     * indices).
     *
     * @param index the index of the element to be removed
     * @return the element that was removed from the list
     * @throws IndexOutOfBoundsException {@inheritDoc}
     */
    public E remove(int index) {
        rangeCheck(index);

        modCount++;
        E oldValue = elementData(index);

        int numMoved = size - index - 1;
        if (numMoved > 0)
            System.arraycopy(elementData, index+1, elementData, index,
                             numMoved);
        elementData[--size] = null; // clear to let GC do its work

        return oldValue;
    }
remove 메서드를 실행하면 가장 먼저 입력받은 index가 적절한 값인지 체크합니다. 그리고 삭제되는 Object의 값을 가져와서 변수에 담습니다. 그 후 arraycopy를 이용해 삭제되는 부분 + 1 ~ 마지막까지의 영역을 삭제되는 부분의 시작점을 기준으로 해서 옮깁니다. 그러면 삭제될 부분의 값은 다음 index의 값으로 겹쳐서 덮여 쓰여지게 됩니다. 그리고 size의 마지막 index는 size - 1의 값과 중복되기 때문에 null처리를 하여 GC가 삭제할 수 있도록 합니다. 그 후 임시 변수에 담아두었던 삭제된 값을 리턴합니다.
private void rangeCheck(int index) {
    if (index >= size)
        throw new IndexOutOfBoundsException(outOfBoundsMsg(index));
}
index범위가 적절한지 체크하는 부분입니다. size보다 index값이 크거나 같으면 범위를 넘은것으로 Exception이 발생합니다.
E elementData(int index) {
    return (E) elementData[index];
}
배열의 값을 가져오는 메서드를 호출하여 oldValue에 넣는 메서드입니다.
int numMoved = size - index - 1;
if (numMoved > 0)
    System.arraycopy(elementData, index+1, elementData, index,
                        numMoved);
elementData[--size] = null; // clear to let GC do its work

return oldValue;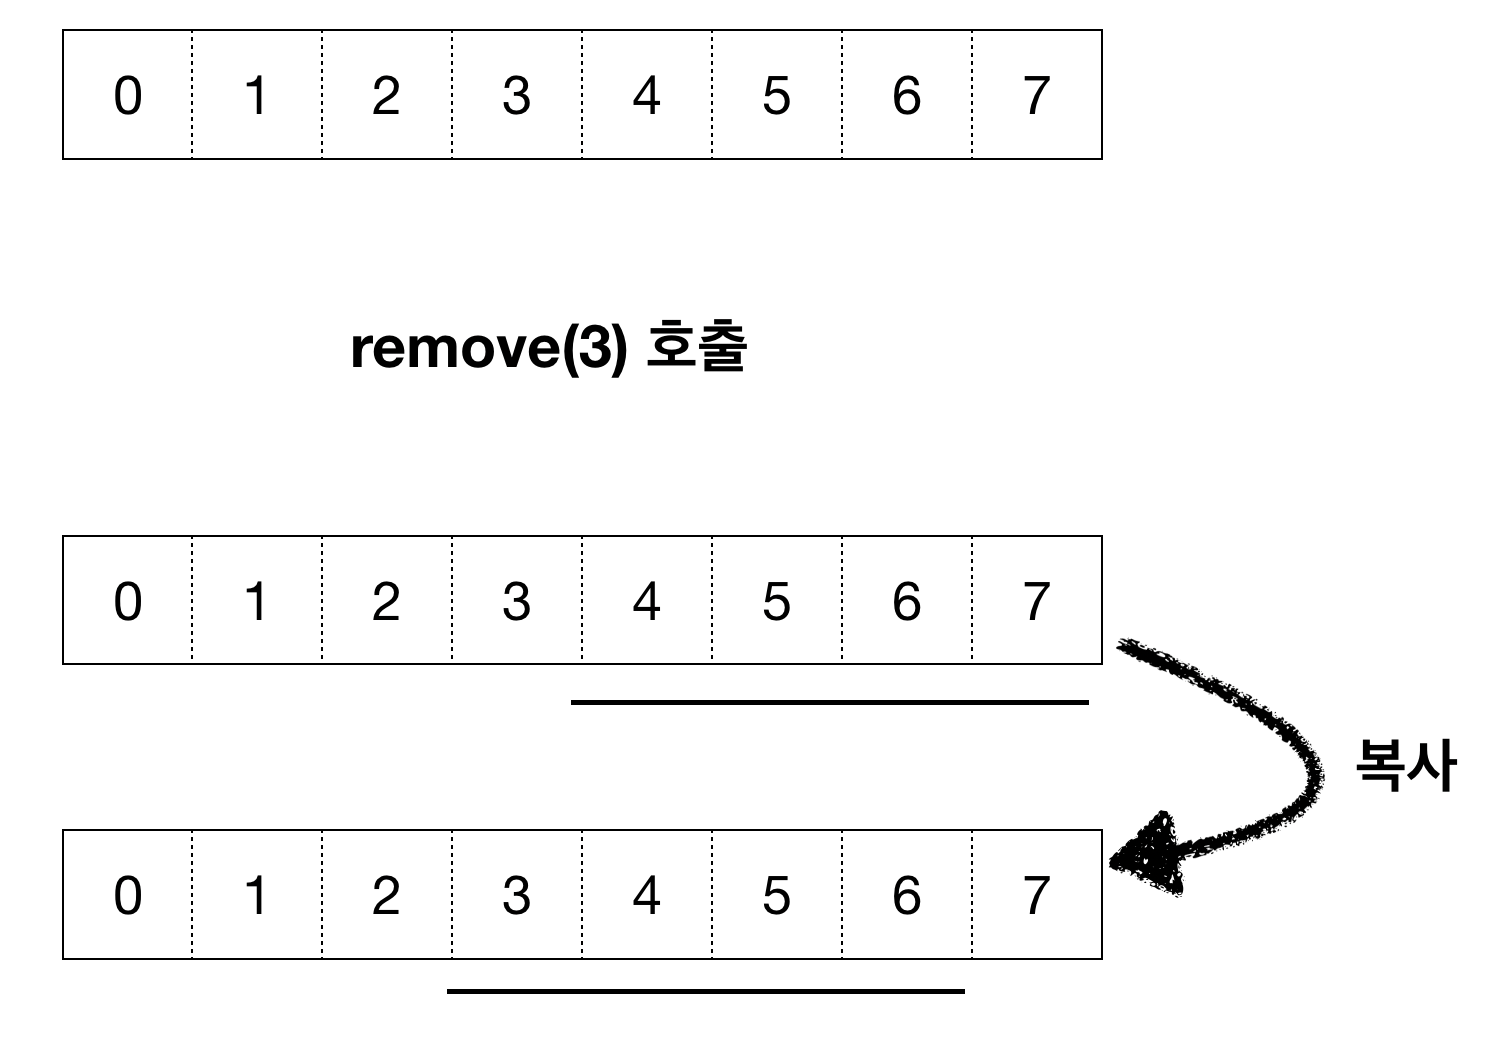
중요한 부분이므로 이미지로 다시 설명드리겠습니다. 코드에 따르면 위와 같이 삭제되는 index의 다음부터 복사하여 삭제되는 index에 붙여 넣습니다. 그렇게 되면 6번과 7번 index가 중복이 일어납니다. 따라서 elementData[--size] = null; 코드를 통해 7번(마지막) index의 값을 null로 변경해 주는것입니다.
- 삭제를 할때 우리는 index + 1에서 부터의 값을 index부터 시작하게끔 복사한다는 것을 알 수 있었습니다. 그때 O(n)의 시간복잡도를 가지며 마지막 값을 null로 변경해줍니다. 이때는 O(1)을 가지겠죠. 삭제에 대해서는 항상 시간복잡도 O(n)을 가진다는 것을 알 수 있습니다.
마무리
오늘은 이렇게 ArrayList에 대해서 코드를 통해 한번 살펴보았습니다.
감사합니다.
참조
https://docs.oracle.com/javase/8/docs/api/java/util/ArrayList.html
'기타 > 자료구조' 카테고리의 다른 글
| [자료구조] 코드로 알아보는 java의 EnumMap (0) | 2020.12.06 |
|---|---|
| [자료구조] 코드로 알아보는 java의 LinkedHashMap (0) | 2020.10.19 |
| [자료구조] 코드로 알아보는 java의 HashSet (0) | 2020.02.17 |
| [자료구조] 코드로 알아보는 java의 LinkedList (0) | 2020.02.14 |
| [자료구조] 코드로 알아보는 java의 Hashmap (2) | 2020.01.25 |


댓글