- [ethereum]Ethereum 설치 및 실행
- [ethereum]Smart Contract(Lottery 시스템) 제작
- [ethereum]ethereum과 통신해보기
- [ethereum]Smart Contract(Lottery 시스템)과 통신해보기 - basic
- [ethereum]Smart Contract(Lottery 시스템)과 통신해보기 - event & log
- [ethereum & java]web3j를 통해 ethereum과 통신해보기
- [ethereum & java]Smart Contract(Lottery 시스템)과 web3j를 통해 통신해보기 - basic
- Smart Contract(Lottery 시스템)과 web3j를 통해 통신해보기 - event & log
저번시간까지 우리는 POST 통신을 통해서 ethereum과 통신을 진행했습니다. 이번주부터는 Web3j를 통해서 java-client와 ethereum간의 통신을 진행해보도록 하겠습니다. web3j는 java진영에서 ethereum통신에 많이 사용되는 오픈소스입니다. 오늘은 web3j에 대한 소개와 사용법을 간단하게 알아도보도록 하겠습니다.
Web3j 소개
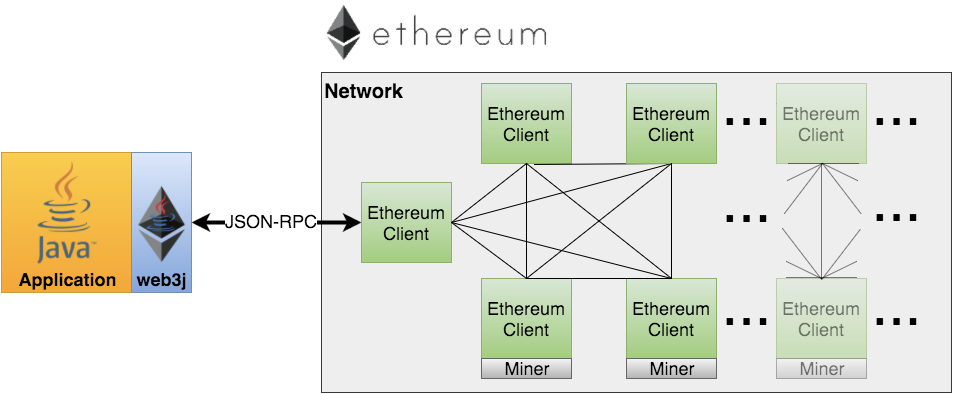
web3j는 자바와 안드로이드에서 사용할 수 있는 ethereum과 smart contract를 쉽게 활용할 수 있게 해주는 라이브러리입니다. 이더리움 통신은 아래와 같이 이루어집니다. 가볍고 경량의 라이브러리라고 소개하고 있습니다.
이런 web3j는 다양한 기능 및 특징을 가지고 있습니다. web3j에서 내세우고 있는 특증을 소개하면 아래와 같습니다.
특징
- ethereum의 JSON-RPC client API의 완벽한 구현
- ethereum wallet 섭포트
- smart-contract를 java로 랩핑하여 생성할 수 있다. 이렇게 생성된 smart-contract java소스는 ethereum과 쉽게 통신할 수 있다.
- ethereum filter의 Reactive-functional API 제공
- ENS(Ethereum Name Service) 제공
- Parity와 Geth의 Personal client API제공
- Infura 지원
- ERC20과 ERC721 기준 토큰 지원
- Command lien Tools 제공
- Android compatible
등이 있습니다. 확실히 상당히 많은 부분을 지원한다는 것을 알 수 있습니다. 그렇다면 우리가 원하는 ethereum과의 통신을 진행해보도록 합시다.
dependency
web3j를 사용하기 위해서는 java에서 maven또는 gradle로 dependency를 설정해주어야합니다. dependency는 아래와 같이 설정해주시면 됩니다.
Maven
Java 8:
<dependency>
  <groupId>org.web3j</groupId>
  <artifactId>core</artifactId>
  <version>4.2.0</version>
</dependency>
Android:
<dependency>
  <groupId>org.web3j</groupId>
  <artifactId>core</artifactId>
  <version>4.2.0-android</version>
</dependency>
Gradle
Java 8:
compile ('org.web3j:core:4.2.0')Android:
compile ('org.web3j:core:4.2.0-android')이렇게 dependency를 주입했다면 이제 Test코드를 한번 작성해 봅시다.
Java를 이용한 코드 작성
@RunWith(SpringRunner.class)
@SpringBootTest
public class EthServiceTest {

    @Test
    public void getEthClientVersionSync() throws Exception
    {
        Web3j web3j = Web3j.build(new HttpService());
        Web3ClientVersion web3ClientVersion = web3j.web3ClientVersion().send();
        System.out.println(web3ClientVersion.getWeb3ClientVersion());
    }


    @Test
    public void getEthClientVersionASync() throws Exception
    {
        Web3j web3 = Web3j.build(new HttpService());  // defaults to http://localhost:8545/
        Web3ClientVersion web3ClientVersion = web3.web3ClientVersion().sendAsync().get();
        System.out.println(web3ClientVersion.getWeb3ClientVersion());
    }

    @Test
    public void getEthClientVersionRx() throws Exception
    {
        Web3j web3 = Web3j.build(new HttpService());  // defaults to http://localhost:8545/
        web3.web3ClientVersion().flowable().subscribe(x -> {
            System.out.println(x.getWeb3ClientVersion());
        });

        Thread.sleep(5000);
    }
}
맨 위에서 부터 sync, async, rx를 이용하여 ethereum과 통신한것을 나타냈습니다.
저는 ganache-cli를 켜고 테스트를 했기때문에 아래와 같이 출력되었습니다.
EthereumJS TestRPC/v2.7.0/ethereum-js이렇게 출력이되면 정상동작 했다고 봐도 됩니다.
만약 java에서
java.net.ConnectException: Failed to connect to localhost/0:0:0:0:0:0:0:1:8545

    at okhttp3.internal.connection.RealConnection.connectSocket(RealConnection.java:225)
    at okhttp3.internal.connection.RealConnection.connect(RealConnection.java:149)
    at okhttp3.internal.connection.StreamAllocation.findConnection(StreamAllocation.java:195)
    at okhttp3.internal.connection.StreamAllocation.findHealthyConnection(StreamAllocation.java:121)
    at okhttp3.internal.connection.StreamAllocation.newStream(StreamAllocation.java:100)
    at okhttp3.internal.connection.ConnectInterceptor.intercept(ConnectInterceptor.java:42)
    at okhttp3.internal.http.RealInterceptorChain.proceed(RealInterceptorChain.java:92)
    at okhttp3.internal.http.RealInterceptorChain.proceed(RealInterceptorChain.java:67)
    at okhttp3.internal.cache.CacheInterceptor.intercept(CacheInterceptor.java:93)
    at okhttp3.internal.http.RealInterceptorChain.proceed(RealInterceptorChain.java:92)
    at okhttp3.internal.http.RealInterceptorChain.proceed(RealInterceptorChain.java:67)
    at okhttp3.internal.http.BridgeInterceptor.intercept(BridgeInterceptor.java:93)
이렇게 stack trace가 뜬다면, ethereum이 실행되지 않았거나, port가 8545로 올라가지 않았을 경우입니다.
만약 포트를 바꾸셔야한다면 아래와 같이 HttpService에 생성자 파라미터로 http url을 주시면 됩니다.
    @Test
    public void getEthClientVersionSync() throws Exception
    {
        Web3j web3j = Web3j.build(new HttpService("url입력")); // url입력 ex) http://localhost:8888
        Web3ClientVersion web3ClientVersion = web3j.web3ClientVersion().send();
        System.out.println(web3ClientVersion.getWeb3ClientVersion());
    }
KoangHoYeom/Ethereum-ClientTest
Ethereum JSON-RPC for study ! Contribute to KoangHoYeom/Ethereum-ClientTest development by creating an account on GitHub.
github.com
해당 링크에 Test코드를 올려놨으니 자유롭게 이용하시면 됩니다.
마무리
이렇게 해서 web3j를 이용하여 간단하게 ethereum과 통신한바는 방법을 알아보았습니다. 이렇게 간편한걸 왜 json-rpc를 통해서 해봤을까요? 그건 바로 web3j또한 json-rpc 프로토콜을 잘 랩핑하고 있는 sdk이기 때문입니다. 코드를 따라시다 보면 결국 web3j또한 ethereum
과 통신하기 위해서 json-rpc 통신을 하는걸 알 수 있습니다. 그럼 오늘은 여기까지 하겠습니다.
감사합니다.
참고
web3j docs : https://docs.web3j.io/
'기타 > 블록체인' 카테고리의 다른 글
| [ethereum & java]Smart Contract(Lottery 시스템)과 web3j를 통해 통신해보기 - event & log (0) | 2019.09.18 |
|---|---|
| [java & ethereum] Smart Contract(Lottery 시스템)를 web3j를 통해 통신해보기 - basic (0) | 2019.09.09 |
| [ethereum] Smart Contract(Lottery 시스템)과 통신해보기 - event & log (0) | 2019.08.28 |
| [Ethereum]Ethereum의 Transaction 처리 Life Cycle 분석 (0) | 2019.08.23 |
| [ethereum] Smart Contract(Lottery 시스템)과 통신해보기 - basic (2) | 2019.08.21 |


댓글