
안녕하세요. 오늘은 저번시간에 이어서 Spring Cloud Zuul 1.0의 실습을 해보도록 하겠습니다. 실습의 순서는 Spring Cloud Zuul 사용을 위한 의존성을 알아보고, Filter 등록 방법, Routing, 그리고 장애에 대비한 Retry 및 Fallback을 사용하는 방법까지 알아보도록 하겠습니다.
pre-condition(사전 조건)
zuul을 실습하기 전에 서비스를 한게 만들고 2개로 띄어두어야 실질적인 테스트를 할 수 있습니다.
아래와 같이 설정 Controller를 제작한 후 build, 2개의 서버를 띄우도록 합시다.
@RestController
public class TestController {
    @GetMapping("/ping")
    public ResponseEntity<String> healthCheck() {
        return ResponseEntity.ok("pong");
    }
}
java -jar application.jar --server.port=8081 &
java -jar application.jar --server.port=8082 &Dependency(의존성)
Zuul을 사용하기 위해서 필요한 Dependency는 아래와 같습니다.
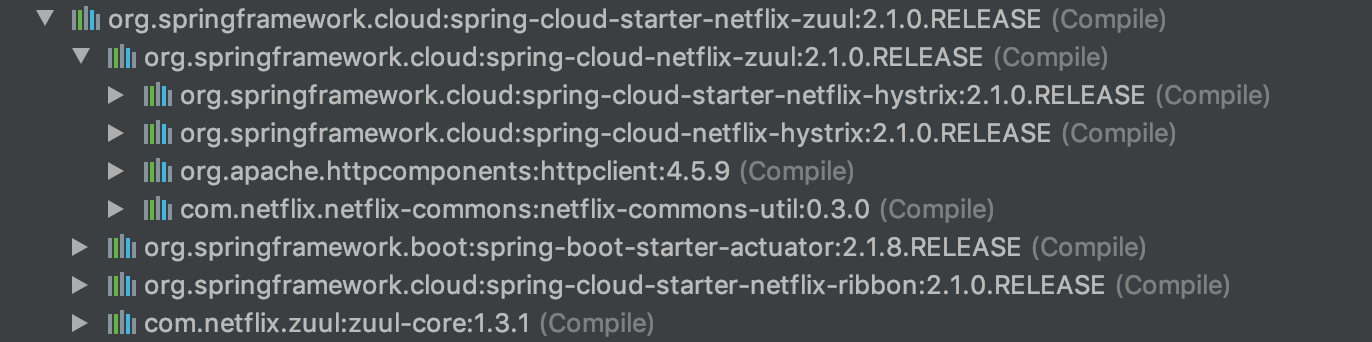
implementation("org.springframework.cloud:spring-cloud-starter-netflix-zuul:2.1.2.RELEASE")저번 포스팅에서 zuul에는 내부 Dependency로 hystrix와 ribbon이 기본적으로 포함되어있다고 했습니다. 실제로 intellij에서 Dependency의 구조도를 확인해보았을 때 아래와 같이 출력됨을 확인할 수 있었습니다.
그리고 Zuul을 사용하기 위해서는 아래와 같이 Annotation을 사용하면 됩니다.
@EnableZuulProxy
@SpringBootApplication
public class ZuulApplication {
    public static void main(String[] args) {
        SpringApplication.run(ZuulApplication.class, args);
    }
}@EnableZuulProxy대신에 @EnableZuulServer를 이용할 수 있습니다. @EnableZuulProxy는 @EnableZuulServer에 eureka를 연동한 proxy 등 추가적인 proxy가 가능하도록 해주는 필터들이 추가되어 있습니다. ex) PreDecorationFilter, RibbonRoutingFilter, SimpleHostRoutingFilter
Routing
대부분 zuul의 설정들은 yml 파일로 설정할 수 있습니다. 기 정의되어있는 기본 값 및 설정할 수 있는 list는 ZuulProperties class를 참조하시면 됩니다.
아래는 기본 라우팅 test를 하기 위해 만들어본 간단한 예제입니다. 아래와 같이 설정되어 있을때 localhost:8080/service-1/ping으로 요청한다면 8081 서버에서 응답이 갈것이고 localhost:8080/service-2/ping으로 요청한다면 8082 서버에서 응답이 올것입니다.
server:
  port: 8080

zuul:
  routes:
    service-1:
      path: /service-1/**
      url: http://localhost:8081
    service-2:
      path: /service-2/**
      url: http://localhost:8082
Retry(Ribbon)
만약 내부서버로 Request가 실패했을 경우 재시도를 하고 다른 서버로 시도하는 역할은 Zuul에서 Ribbon을 통해 구현할 수 있습니다. 설정 방법은 {service-id}.ribbon.~~으로 Ribbon의 설정 방법과 동일합니다. 그리고 추가적으로 zuul.retryable=true로 설정해주면 됩니다. ribbon의 설정 내용은 [MSA] Spring Cloud Ribbon - 개념과 실습편을 참고해주시면 됩니다.
zuul:
  retryable: true

service-1:
  ribbon:
    MaxAutoRetries: 1
    MaxAutoRetriesNextServer: 1
    OkToRetryOnAllOperations: true
    ConnectTimeout: 3000
    ReadTimeout: 5000
service-2:
  ribbon:
    MaxAutoRetries: 1
    MaxAutoRetriesNextServer: 1
    OkToRetryOnAllOperations: true
    ConnectTimeout: 3000
    ReadTimeout: 5000
Hystrix - Fallback
API Gateway는 외부에서 서비스에 접속하기 위한 End-Point의 역할을 대신해줍니다. 그렇기 때문에 만약 서비스가 장애가 난다면 그 영향은 API Gateway에 미칠 수 밖에 없습니다. 이럴때를 위해 Zuul은 Hystrix를 기본적으로 내장하고 있습니다. 내장되어있는 Hystrix는 아래와 같이 yaml 파일로 설정을 변경할 수 있습니다. 설정방법은 기존 hystrix와 같으며 yaml로 hystrix에 대해 설정할 수 있습니다. hystrix의 자세한 설명은 [MSA] Spring Cloud Hystrix - 개념편과 [MSA] Spring Cloud Hystrix - 실습편을 참고해주시기 바랍니다.
zuul:
  ribbon-isolation-strategy: thread

# hystrix yaml로 설정하는 방법
hystrix:
  command:
    default:
      execution:
        isolation:
          thread:
            timeoutInMilliseconds: 32000
      circuitBreaker:
        enabled: true
        requestVolumeThreshold: 3
        sleepWindowInMilliseconds: 5000
        errorThresholdPercentage: 50
      metrics:
        rollingStats:
          timeInMilliseconds: 10000
route별 fallback 만들기. zuul에서는 FallbackProvider를 구현하여 이용하여 route 별로 fallback method를 제작할 수 있습니다. 제작하는 방법은 아래와 같습니다. 각 method 및 Annotation의 역할에 대해서는 코드에 주석으로 달아두었습니다.
@Configuration // Componenet Scan에 Scan 되도록 하며 bean 등록
public class AuthServiceFallbackConfiguration implements FallbackProvider {

    private static final String NOT_AVAILABLE = "service-1 is not available.";

   /**
      * The route this fallback will be used for.
      * @return The route the fallback will be used for.
     */
    @Override // fallback을 등록할 route return
    public String getRoute() {
        return "service-1";
    }

    /**
      * Provides a fallback response based on the cause of the failed execution.
      *
      * @param route The route the fallback is for
      * @param cause cause of the main method failure, may be <code>null</code>
      * @return the fallback response
      */
    @Override // fallback 발생 시 호출되는 method
    public ClientHttpResponse fallbackResponse(String route, Throwable cause) {
        if (cause instanceof HystrixTimeoutException) {
            return new GatewayClientResponse(HttpStatus.GATEWAY_TIMEOUT, NOT_AVAILABLE);
        } else {
            return new GatewayClientResponse(HttpStatus.INTERNAL_SERVER_ERROR, NOT_AVAILABLE);
        }
    }
}
위의 형식으로 FallbackProvider를 구현하게 되면 AbstractRibbonCommandFactory에 의해서 자동으로 cache에 등록이 됩니다. 그리고 Error 발생시 Error Filter로 넘어가고 위의 fallbackResponse가 실행되어지게 됩니다. 그리고 각 서비스의 에러 response에 대해서 zuul에서 감싸서 return하고자 하여 GatewayClientResponse 객체를 리턴하게 만들었고 그 안의 내용은 아래와 같습니다.
class GatewayClientResponse implements ClientHttpResponse {

    private HttpStatus httpStatus;
    private String message;

    public GatewayClientResponse(HttpStatus httpStatus, String message) {
        this.httpStatus = httpStatus;
        this.message = message;
    }

    @Override
    public HttpStatus getStatusCode() throws IOException {
        return httpStatus;
    }

    @Override
    public int getRawStatusCode() throws IOException {
        return httpStatus.value();
    }

    @Override
    public String getStatusText() throws IOException {
        return httpStatus.getReasonPhrase();
    }

    @Override
    public void close() {

    }

    @Override
    public InputStream getBody() throws IOException {
        return new ByteArrayInputStream(message.getBytes());
    }

    @Override
    public HttpHeaders getHeaders() {
        HttpHeaders headers = new HttpHeaders();
        headers.setContentType(MediaType.APPLICATION_JSON);
        return headers;
    }
}
Custom Filter 추가
Zuul의 Filter를 추가하는 방법은 ZuulFilter을 상속받아서 구현하는 것입니다. 상속을 받게되면 저번 Zuul의 개념편에서 보았던 4가지를 필수적으로 재정의 해주시면 사용할 수 있게 됩니다. 각 내용은 아래에서 보도록 하겠습니다.
public class RouteFilter extends ZuulFilter {

    @Override
    public String filterType() {
        return "route";
    }

    @Override
    public int filterOrder() {
        return 1;
    }

    @Override
    public boolean shouldFilter() {
        return true;
    }

    @Override
    public Object run() {
        System.out.println("Inside Route Filter");
        return null;
    }
}- filterType() : filter의 type으로 "pre", "route", "post", "error", "static"을 용도에 따라 return 하면 됩니다.
- filterOrder() : type안에서 해당 필터가 실행되는 순서입니다.
- shoudFilter() : run method를 실행한다면 true, 실행하지 않아도 된다면 false를 return합니다.
- run() : 실제 filter의 로직을 담당하는 method입니다.
이렇게 만든 Class는 Bean으로 등록하면 filter가 등록되어 사용할 수 있게 됩니다.
마무리
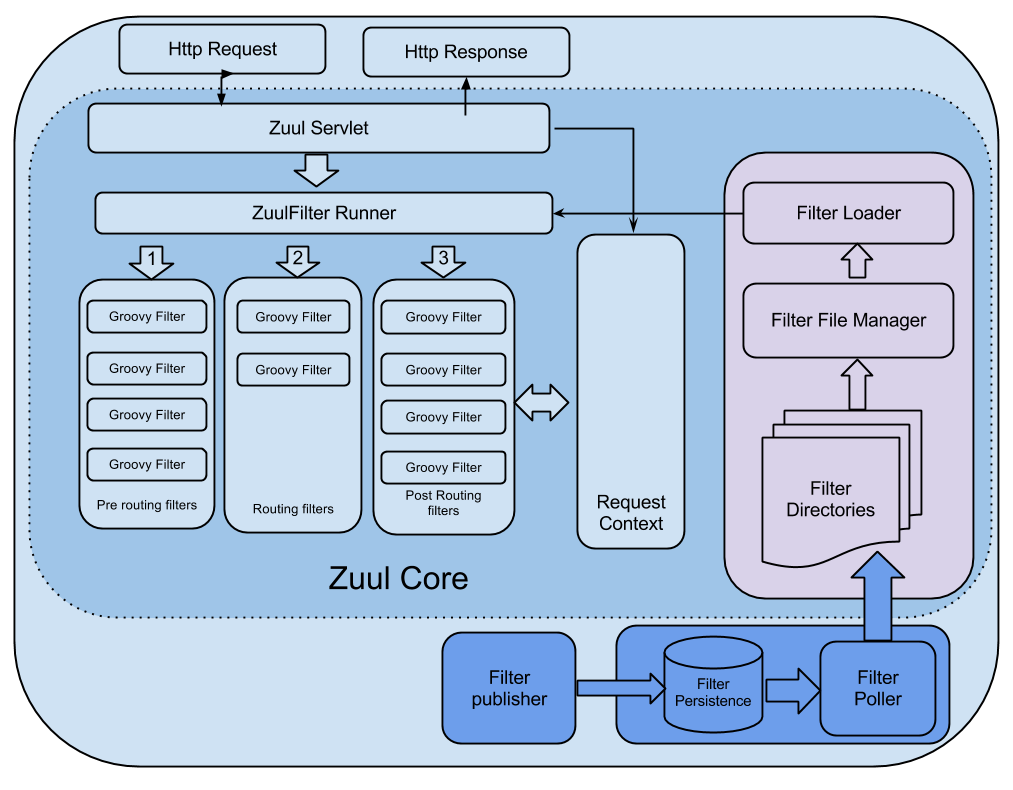
위의 아키텍처는 Zuul 시스템이 전체적으로 어떻게 돌아가는지 나타낸 아키텍처입니다. 오늘은 위 아키텍처를 구현 및 코드로 확인해보며 알아보는 시간을 가졌습니다.
감사합니다.
참조
#enablezuulproxy-vs-enablezuulserver
https://netflixtechblog.com/announcing-zuul-edge-service-in-the-cloud-ab3af5be08ee
'language, framework, library > Spring Cloud' 카테고리의 다른 글
| [MSA] Spring Cloud Eureka - 실습편 (0) | 2020.02.10 |
|---|---|
| [MSA] Spring Cloud Eureka에 관하여 - 이론편 (1) | 2020.02.05 |
| [MSA] Spring Cloud Zuul 1.x - 개념편 (0) | 2020.01.20 |
| [MSA] Spring Cloud Ribbon - 개념과 실습편 (0) | 2020.01.12 |
| [MSA] Spring Cloud Hystrix - 실습편 (0) | 2020.01.08 |


댓글