Spring의 특징이라고 하면 IoC(또는 DI), PSA(Portable Service Architecture) 그리고 AOP(Aspect-Oriented Programming)가 있습니다. 이 개념이 무엇인가? 에 대해서는 이번 포스팅에서 언급하진 않겠습니다. 궁금하신 분은 저의 Spring 카테고리에 하나씩 설명이 되어있으니 해당 포스팅들을 참고 부탁드립니다. 저는 다른부분에 대해서 말해보려고 합니다.
AOP는 관점지형 프로그래밍으로 main기능이 아닌 기능(Logging / Transaction)을 묶음으로 하여 Main Function을 잘 구성할 수 있게 해주는 방식입니다. 따라서 비즈니스 로직의 중간에 소스코드를 삽입해야하는데 이를 지원해주는 방식은 일반적으로 3가지로 구현이 가능합니다.
- Source Code -> ByteCode
- 우리가 구성하는 소스코드가 ByteCode가 되는 시점에 코드를 Injection하는 방법
- ByteCode -> Class Load
- ByteCode가 된 Code가 ClassLoader에 의해 Memory로 올라갈 때 Injedtion되는 방법
- Proxy Pttern
- Proxy Pattern이라는 디자인 패턴을 이용하는 방법
Spring은 AOP를 구현하기 위해 3번인 Proxy Pattern을 사용합니다. 오늘은 Spring에서 사용된 디자인 패턴 중 하나인 Proxy Pattern에 대해서 알아보도록 하겠습니다.
Proxy pattern
일반적인 Method의 형식을 잠깐 보겠습니다.
public Object process(String foo)
{
    Log

    ..some process..

    Log
}
DB와 상호작용하여 데이터를 쓰거나 읽거나 한다면 아래와 같겠죠.
public Object process(String foo)
{
    Transaction을 위한 Connection 얻기.

    ..some process..

    Transaction을 위한 Connection 반환.
}
한 method안에 부수적인 일들이 너무 많습니다. Log를 찍는 다던지, Transaction의 기본 세팅을 해준다던지 말이죠. 이런 부분을 Proxy Pattern을 이용하면 우리는 해당 Method에서 코드를 제거하면서 동일한 효과를 가져올 수 있습니다. 어떻게 이렇게 될 수 있는지 이제 Proxy Pattern의 구조와 Flow를 한번 보도록 하겠습니다.
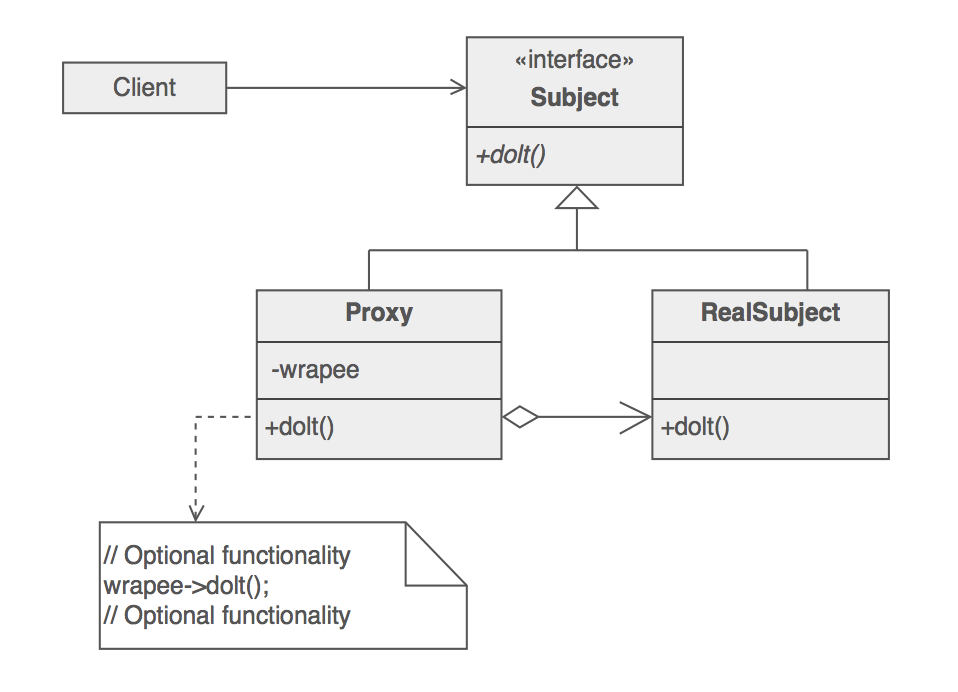
Proxy Pattern은 위와 같은 구조를 가지게 됩니다. Flow를 보도록 하겠습니다.
- Client가 해당 함수를 직접호출 하는게 아닌 Proxy를 호출합니다.
- Proxy Class에서 실제 Class를 호출합니다. (Proxy Class는 실제로 호출할 Class를 이미 가지고 있습니다.)
- 실제 Class에서 반환 받은 값을 Client에게 반환합니다.
이렇게 하면 우리의 부수적인 업무들을 Proxy에 코딩하고 주요한 업무를 실제 클래스에 코딩할 수 있게되는 것이지요.
Proxy pattern을 코드로 보기
다음의 예제를 한번 실제 코딩으로 하여 적용해 보겠습니다.
package com.main.proxy;

/**
 * 1. Payment
 */
public interface Payment {
    int amount();
}
package com.main.proxy;

/**
 * 2. FundsPaidFromAccount : Real Class
 */
public class FundsPaidFromAccount implements Payment{

    private int payMoney = 1000;

    @Override
    public int amount() {
        System.out.println(payMoney);
        return payMoney;
    }
}
package com.main.proxy;

/**
 * 3. CheckProxy : Proxy Class
 */
public class CheckProxy implements Payment{

    Payment payment = new FundsPaidFromAccount();

    @Override
    public int amount() {

        System.out.println("===========================");
        int money = payment.amount();
        System.out.println("===========================");

        return money;
    }
}
package com.main.proxy;

/**
 * 4. Main : Client
 */
public class Main {

    public static void main(String[] args) {
        Payment payment = new CheckProxy();
        payment.amount();
    }

}
간단하게 구성해 보았습니다. flow를 한번 보겠습니다.
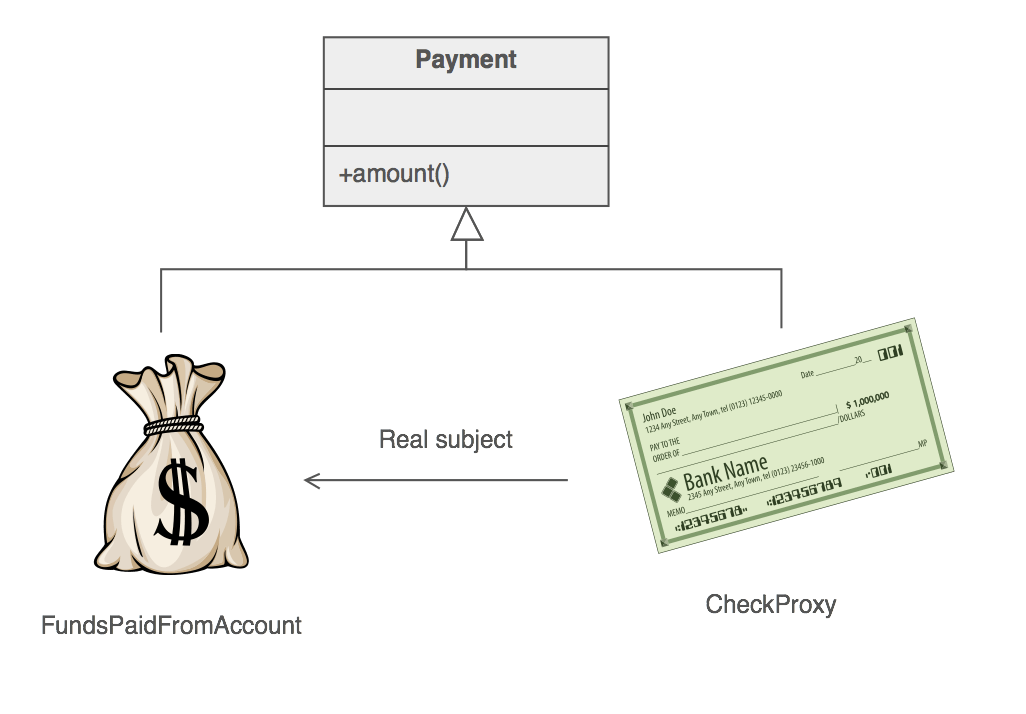
- Client는 RealClass인
FundsPaidFromAccount를 바로 호출하는 것이 아니라 Proxy Class인CheckProxyClass를 호출합니다. (Payment로 받은 이유는 다른 Payment가 생길 수도 있기 때문에 추후 확장성을 생각했습니다.) payment()를 호출하게 되면 Proxy Class의 payment() method가 호출되게 됩니다.- 호출 된
CheckProxyClass를 보게되면 내부에 RealClass인FundsPaidFromAccount라는 Class를 맴버변수로 가지고 있는것을 알 수 있습니다. 그렇기 때문에 CheckProxy의 amount() 메서드는FundsPAidFromAccount#amount()를 실행시킬 수 있습니다. amount메서드는 RealClass를 자유롭게 실행시킬 수 있다는 것을 알 수 있습니다.;
장점과 단점
- 프록시 패턴의 장점
- 사이즈가 큰 객체가 로딩되기 전에도 proxy를 통해 참조를 할수 있다.(이미지,동영상등의 로딩에서 반응성 혹은 성능 향상 - 가상 프록시)
- 실제 객체의 public, protected 메소드들을 숨기고 인터페이스를 통해 노출시킬수 있다. (안전성 - 보호 프록시)
- 로컬에 있지 않고 떨어져 있는 객체를 사용할수 있다. (RMI, EJB 의 분산처리등 - 원격 프록시)
- 원래 객체의 접근에 대해서 사전처리를 할수 있다 (객체의 레퍼런스 카운트 처리 - 스마트 프록시)
- 원본 객체의 참조만 필요할때는 원복 객체를 사용하다가, 최대한 늦게 복사가 필요한 시점에 원본 객체를 복사하여 사용하는 방식. (Concurrent package의 CopyInWriteArrayList - 변형된 가상 프록시)
- 프록시 패턴의 단점
- 객체를 생성할때 한단계를 거치게 되므로, 빈번한 객체 생성이 필요한 경우 성능이 저하될수 있다.
- 프록시안에서 실제 객체 생성을 위해서 thread가 생성되고 동기화가 구현되야 하는 경우 성능이 저하되고 로직이 난해해질 수 있다.
Spring에서는 어디에 쓰였을까 ?
들어가기 앞서 아래내용은 Spring의 3대 핵심요소인 AOP에 대한 이해를 필요로합니다. 따라서 해당 지식이 없으신분들은 내용 이해가 난해할 수 있습니다. 따라서 사전에 [Spring] Spring AOP - 기본 이론편을 먼저 보고 이해하시는게 아래 내용이해에 도움이 될 것입니다.
Spring에서는 어노테이션(Annotaion)으로 서비스 추상화되어 많이 사용됩니다. 우리가 DB를 사용할 때 사용하는 @Transactional을 보도록 합시다. 해당 Annotation은 DB Transaction에 대해서 코딩을 간단하게 만들어 주며, 비즈니스에 집중할 수 있도록 도움을 줍니다.
어노테이션 @Transactional의 내부를 한번 보도록 하겠습니다.
    [개략적인 Transactinal에 대한 설명]
    @Inherited
    @InterceptorBinding
    @Target({ElementType.TYPE, ElementType.METHOD})
    @Retention(value = RetentionPolicy.RUNTIME)
    public @interface Transactional {
    [적당한 함수]
이렇게 나옵니다. 이 정보로는 우리가 보고싶은 실제 동작이 어떻게 하는지 코드로 볼 수가 없습니다. 우리가 보고싶은 실제 method구현을 보기위해서는 aspect를 봐야합니다. File 찾기를 통해 Transactional annotation이 사용된 aspect를 찾아봅시다.
[개략적인 설명]
 * @author Stephane Nicoll
 * @since 4.2
 * @see javax.transaction.Transactional
 * @see AnnotationTransactionAspect
 */
@RequiredTypes("javax.transaction.Transactional")
public aspect JtaAnnotationTransactionAspect extends AbstractTransactionAspect {

    public JtaAnnotationTransactionAspect() {
        super(new AnnotationTransactionAttributeSource(false));
    }

    /**
     * Matches the execution of any public method in a type with the Transactional
     * annotation, or any subtype of a type with the Transactional annotation.
     */
    private pointcut executionOfAnyPublicMethodInAtTransactionalType() :
        execution(public * ((@Transactional *)+).*(..)) && within(@Transactional *);

    /**
     * Matches the execution of any method with the Transactional annotation.
     */
    private pointcut executionOfTransactionalMethod() :
        execution(@Transactional * *(..));

    /**
     * Definition of pointcut from super aspect - matched join points
     * will have Spring transaction management applied.
     */
    protected pointcut transactionalMethodExecution(Object txObject) :
        (executionOfAnyPublicMethodInAtTransactionalType() || executionOfTransactionalMethod() ) && this(txObject);

}
위 내용을 이해하기 위해서는 aspectj의 aspect, pointcut 등이 무엇인지, 어떻게 돌아가는지 알아야합니다. 위의 내용만 개략적으로 설명드리자면 @Transactional이 붙어있는 메서드면 어디든 trnasactionalMethodExecution method가 실행된다. 이렇게 이해하시면 될것 같습니다.
trnasactionalMethodExecution의 주석을 보니 실제 구현 method는 super class에 있다고 하니 따라가보겠습니다.
@SuppressAjWarnings("adviceDidNotMatch")
    Object around(final Object txObject): transactionalMethodExecution(txObject) {
        MethodSignature methodSignature = (MethodSignature) thisJoinPoint.getSignature();
        // Adapt to TransactionAspectSupport's invokeWithinTransaction...
        try {
            return invokeWithinTransaction(methodSignature.getMethod(), txObject.getClass(), new InvocationCallback() {
                public Object proceedWithInvocation() throws Throwable {
                    return proceed(txObject);
                }
            });
        }
        catch (RuntimeException | Error ex) {
            throw ex;
        }
        catch (Throwable thr) {
            Rethrower.rethrow(thr);
            throw new IllegalStateException("Should never get here", thr);
        }
    }
해당 method가 실제로 어떻게 aspect로 도는지는 모르겠지만, around라는 것 그리고 우리가 찾은 method 명이라는 것을 토대로 해당 메서드가 맞다는 것을 확인할 수 있습니다. 여기서 또 보면 바로 process를 실행시키는 것이 아닌 Callback method로 실행시킵니다.
invokeWithinTransaction를 다시 들어가보겠습니다.
@Nullable
    protected Object invokeWithinTransaction(Method method, @Nullable Class<?> targetClass,
            final InvocationCallback invocation) throws Throwable {

        // If the transaction attribute is null, the method is non-transactional.
        TransactionAttributeSource tas = getTransactionAttributeSource();
        final TransactionAttribute txAttr = (tas != null ? tas.getTransactionAttribute(method, targetClass) : null);
        final PlatformTransactionManager tm = determineTransactionManager(txAttr);
        final String joinpointIdentification = methodIdentification(method, targetClass, txAttr);

        if (txAttr == null || !(tm instanceof CallbackPreferringPlatformTransactionManager)) {
            // Standard transaction demarcation with getTransaction and commit/rollback calls.
            TransactionInfo txInfo = createTransactionIfNecessary(tm, txAttr, joinpointIdentification);

            Object retVal;
            try {
                // This is an around advice: Invoke the next interceptor in the chain.
                // This will normally result in a target object being invoked.
                retVal = invocation.proceedWithInvocation();
            }
            catch (Throwable ex) {
                // target invocation exception
                completeTransactionAfterThrowing(txInfo, ex);
                throw ex;
            }
            finally {
                cleanupTransactionInfo(txInfo);
            }
            commitTransactionAfterReturning(txInfo);
            return retVal;
        }
해당메서드 입니다. 자 이제 여러분들 proxy pattern이 보이시나요?
잘안보이실 수 있으니 flow를 따라가며 설명드리겠습니다.
따라가다 보면 아래와 같은 부분이 보이실 겁니다.
TransactionInfo txInfo = createTransactionIfNecessary(tm, txAttr, joinpointIdentification);위의 코드, 이부분이 transaction을 위해 connection을 가져오는 부분입니다.
retVal = invocation.proceedWithInvocation();아까 등록되어있던 callback method를 가져와 실행시키는 모습입니다.
commitTransactionAfterReturning(txInfo);마지막으로 transaction을 해제하는 부분입니다.
우리가 실질적으로 코딩해서 실행되는 부분은 invocation#proceedWithInvocation() 부분이죠. 우리는 나머지 transaction을 얻어오고 해제하는 부분에 대해서 전혀 신경 쓸 필요가 없던게 이런 이유가 있던겁니다.
마무리
이렇게 Spring AOP에는 Proxy Pattern이 적용되어있다는 것을 확인하였습니다.
다음에 뵙겠습니다.
감사합니다. 추석연휴 잘보내세요.
참조
https://sourcemaking.com/design_patterns/proxy
https://docs.spring.io/spring/docs/5.1.9.RELEASE/spring-framework-reference/core.html#spring-core
'기타 > 디자인 패턴' 카테고리의 다른 글
| [Design Pattern] Java에서 발견한 디자인패턴_Decorator Pattern (0) | 2020.01.30 |
|---|---|
| 객체지향 설계의 5가지 원칙 S.O.L.I.D (0) | 2019.11.04 |
| [Spring & Design Pattern] Spring에서 발견한 Design Pattern_strategy pattern (2) | 2019.10.16 |
| [Spring & Design Pattern] Spring에서 발견한 디자인패턴_Singleton Pattern (0) | 2019.09.23 |
| [Spring & Design Pattern] Spring에서 발견한 디자인패턴_template method pattern (1) | 2019.09.04 |


댓글