
안녕하세요. 저는 요즘 회사에서 Java로 Ethereum Client를 만들고 있습니다. 프로젝트를 진행함에 있어 Spring MVC를 사용하였는데요. 서버로 들어올때 url에 따라 분기를 쳐주는 역할을 하는 DispatcherServlet, 원리는 들어보고 알고 있었지만 이게 코드로 어떻게 구현되어 있지? 라는 생각이 들었고, 한번 파헤쳐보기로 했습니다.
오늘은 Spring MVC의 중심이라고 할 수 있는 DispatcherServlet, 그 중에서도 request를 처리하는 방법에 대해서 코드를 따라가며 분석해 보도록 하겠습니다.
DispatcherServlet ?
spring 공식문서에서는 DispatcherServlet을 아래와 같이 정의하고 있습니다.
Spring MVC, as many other web frameworks, is designed around the front controller pattern where a central Servlet, the DispatcherServlet, provides a shared algorithm for request processing, while actual work is performed by configurable delegate components. This model is flexible and supports diverse workflows.
한글로 요약하자면 웹프레임워크에서는 Client의 Request에 대해 실제 처리하는 method를 호출해주거나 하는 front Controller의 역할을 해주는 Instance가 필요한데 Spring에서는 DispatcherServlet이 한다. 정도록 볼 수 있겠네요.
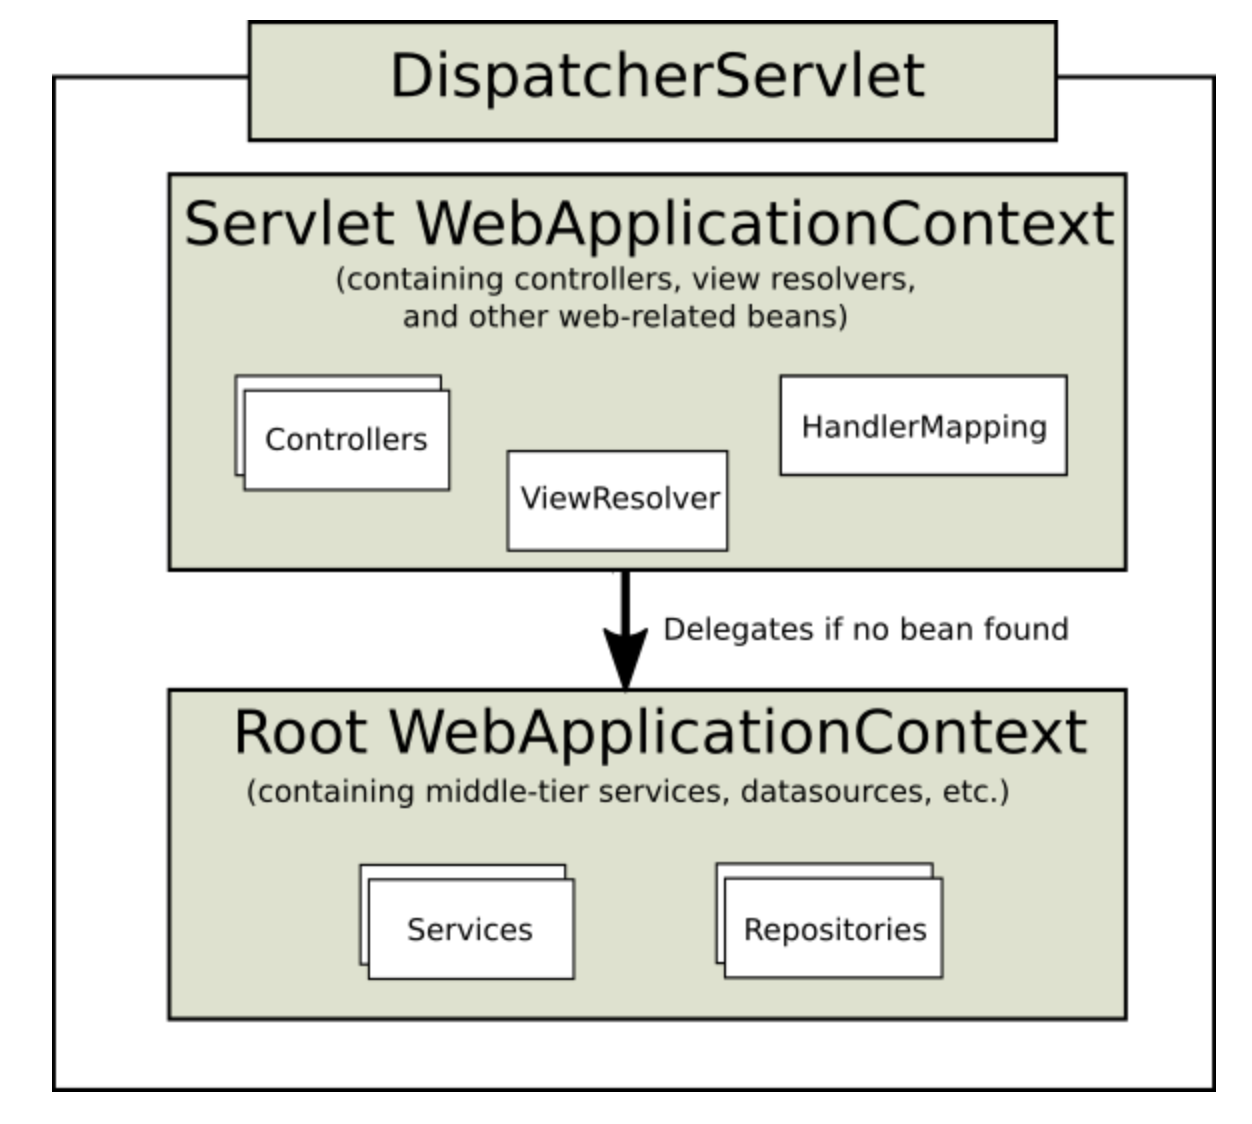
아래는 DispatcherServlet에 대한 이미지입니다. 보시면 Root를 Serlvet이 상속 받고 있는것을 알 수 있습니다. 처음 Servlet Container가 Instance가 되면 그걸 보고 ContextLoaderListener가 실행된다고 알고 있습니다. 이 Listener가 WebApplicationContext를 띄우는데 WebApplicationContext에서 bean을 등록해줍니다. 그런데 아래 그림을 보시면 Root WebApplicationContext에는 Service와 Repository Annotation이 붙은 Class만 등록해주며 Servlet WebApplicationContext는 Controller, HandlerMapping 등도 해주는 것을 알 수 있습니다. 다행히 상속관계이기 때문에 Serlvlet WebApplicationContext를 사용하면 모두 Bean으로 등록해 주는것을 알 수 있습니다.
DispatcherServlet Process
The WebApplicationContext is searched for and bound in the request as an attribute that the controller and other elements in the process can use. It is bound by default under the DispatcherServlet.WEB_APPLICATION_CONTEXT_ATTRIBUTE key.
The locale resolver is bound to the request to let elements in the process resolve the locale to use when processing the request (rendering the view, preparing data, and so on). If you do not need locale resolving, you do not need the locale resolver.
The theme resolver is bound to the request to let elements such as views determine which theme to use. If you do not use themes, you can ignore it.
If you specify a multipart file resolver, the request is inspected for multiparts. If multiparts are found, the request is wrapped in a MultipartHttpServletRequest for further processing by other elements in the process. See Multipart Resolver for further information about multipart handling.
An appropriate handler is searched for. If a handler is found, the execution chain associated with the handler (preprocessors, postprocessors, and controllers) is executed in order to prepare a model or rendering. Alternatively, for annotated controllers, the response can be rendered (within the HandlerAdapter) instead of returning a view.
If a model is returned, the view is rendered. If no model is returned (maybe due to a preprocessor or postprocessor intercepting the request, perhaps for security reasons), no view is rendered, because the request could already have been fulfilled.
공식문서에 나와있는 dispatcherservlet의 process라는 부분에 명시되어 있는 문장입니다. 제 나름대로 요약을 해보았습니다.
- 들어온 요청에 대해서 사용할수 있는 WebApplicationContext를 찾고 request에 Binding한다.
- 들어온 요청에 대해서 사용할수 있는 localeResolver를 찾고 request에 binding한다.
- 들어온 요청에 대해서 사용할수 있는 themeResolver를 찾고 binding한다.
- 들어온 요청에 대해서 사용할수 있는 multipartResolver를 찾고 binding한다. 요청이 실제로 multipart 요청이라면 multipart 요청으로 별도 처리된다.
- 적절하게 처리할 handler를 찾는다. 만약 찾았다면 rendering을 위한 handler와 interceptor가 실행이 됩니다. adapter를 통해 hadler가 실행된다. 만약 view이름이 return되어지면, Model과 View를 매핑 후 그린다. View가 없다면 rendering없이 그대로 응답한다. ex) REST API 등
아래의 이미지는 5번의 내용을 좀 더 명확하게 해 둔 부분입니다.

Code 분석
자 그럼 이제 오늘의 메인이 였던 코드를 보겠습니다.
Class를 먼저 봅시다... FrameworkServlet이라는 것을 상속받고 있네요.
public class DispatcherServlet extends FrameworkServlet그러면 FrameworkServlet은 누구를 상속받고 있는지 봅시다.
public abstract class FrameworkServlet extends HttpServletBean implements ApplicationContextAware또... 타고 들어가면~~
public abstract class HttpServletBean extends HttpServlet implements EnvironmentCapable, EnvironmentAware우리가 JSP&Servlet할때 일반적으로 사용했던 HttpServlet을 결국 DIspatcherSerlet이 동일하게 상속받고 있는것을 알 수 있었습니다. 여기서 우리는 기존 Servlet과 life-cycle이 비슷하겠구나 하는 것을 추론할 수 있습니다. 그렇게 생각하고 한 번 보도록 합시다. 그러면 우리는 Servlet의 life-cycle을 떠올리면서 찾아야하는 method가 doGet, doPost, doService 정도라는 걸 알 수 있습니다.
먼저 FrameworkServlet에서 하나를 찾아보겠습니다.
@Override
    protected final void doGet(HttpServletRequest request, HttpServletResponse response)
            throws ServletException, IOException {

        processRequest(request, response);
    }
processRequest를 한번 볼까요? 우리에게 필요하지 않은 소스는 중략처리했습니다.
protected final void processRequest(HttpServletRequest request, HttpServletResponse response)
            throws ServletException, IOException {

        long startTime = System.currentTimeMillis();
        Throwable failureCause = null;

        ...[중략]

        try {
            doService(request, response);
        }
        catch (ServletException | IOException ex) {
            failureCause = ex;
            throw ex;
        }
        ...[중략]
    }
저기 저 doService가 보이시나요? 저게 바로 우리가 찾던 dispatcherservlet의 method입니다! 타고 들어갔더니?
    protected abstract void doService(HttpServletRequest request, HttpServletResponse response)
            throws Exception;
template method pattern입니다. 상속받은 Class에게 method를 위임하는 거죠. 우리가 DispatcherServlet을 Instance로 가지고 processRequest method를 호출했다고 하면, doService method는 DispatcherServlet의 doService method가 호출되는 겁니다. 한번 보도록 합시다.
/**
     * Exposes the DispatcherServlet-specific request attributes and delegates to {@link #doDispatch}
     * for the actual dispatching.
     */
    @Override
    protected void doService(HttpServletRequest request, HttpServletResponse response) throws Exception {
        logRequest(request);

        // Keep a snapshot of the request attributes in case of an include,
        // to be able to restore the original attributes after the include.

        // 요청의 종류가 include라면 map에 attribute값들 넣기.
        Map<String, Object> attributesSnapshot = null;
        if (WebUtils.isIncludeRequest(request)) {
            attributesSnapshot = new HashMap<>();
            Enumeration<?> attrNames = request.getAttributeNames();
            while (attrNames.hasMoreElements()) {
                String attrName = (String) attrNames.nextElement();
                if (this.cleanupAfterInclude || attrName.startsWith(DEFAULT_STRATEGIES_PREFIX)) {
                    attributesSnapshot.put(attrName, request.getAttribute(attrName));
                }
            }
        }

        // Make framework objects available to handlers and view objects.

        /* 1. WebApplicationContext를 찾고 Binding한다.   AnnotationConfigWebApplicationContext가 Binding되며 servletConfigClasses들이 binding 된다. */
        request.setAttribute(WEB_APPLICATION_CONTEXT_ATTRIBUTE, getWebApplicationContext());

        // 2. localeResolver[지역 정보]를 binding한다.
        request.setAttribute(LOCALE_RESOLVER_ATTRIBUTE, this.localeResolver);

        // 3. themeResolver[테마 정보]를 binding한다.
        request.setAttribute(THEME_RESOLVER_ATTRIBUTE, this.themeResolver);

        // 테마를 가져와서러 request에 넣기.
        request.setAttribute(THEME_SOURCE_ATTRIBUTE, getThemeSource());

        // flashMap을 사용할때...
        // flashMap이란 ? 요청을 redirection할 때, 데이터를 담아서 같이 넘기고 넘긴후 삭제 할 필요가 있을때 쓰는 임시적인 Map
        if (this.flashMapManager != null) {
            FlashMap inputFlashMap = this.flashMapManager.retrieveAndUpdate(request, response);
            if (inputFlashMap != null) {
                request.setAttribute(INPUT_FLASH_MAP_ATTRIBUTE, Collections.unmodifiableMap(inputFlashMap));
            }
            request.setAttribute(OUTPUT_FLASH_MAP_ATTRIBUTE, new FlashMap());
            request.setAttribute(FLASH_MAP_MANAGER_ATTRIBUTE, this.flashMapManager);
        }

        try {
            doDispatch(request, response);
        }
        finally {
            if (!WebAsyncUtils.getAsyncManager(request).isConcurrentHandlingStarted()) {
                // Restore the original attribute snapshot, in case of an include.
                if (attributesSnapshot != null) {
                    restoreAttributesAfterInclude(request, attributesSnapshot);
                }
            }
        }
    }
여기까지 doService의 소스였습니다. 중요한 부분은 제가 주석으로 표시해 두었으니 참고하시면 될 것 같습니다.
doDispatch를 호출하는데 아마 여기에서 나머지 flow가 일어나지 않을까합니다. 한번 들어가 보겠습니다.
protected void doDispatch(HttpServletRequest request, HttpServletResponse response) throws Exception {
        HttpServletRequest processedRequest = request;
        HandlerExecutionChain mappedHandler = null;
        boolean multipartRequestParsed = false;

        WebAsyncManager asyncManager = WebAsyncUtils.getAsyncManager(request);

        try {
            ModelAndView mv = null;
            Exception dispatchException = null;

            try {
                // 4. 들어온 요청에 대해서 사용할수 있는 multipart resolver를 찾고 binding한다. 요청이 실제로 multipart 요청이라면 multipart 요청을 처리한다.
                processedRequest = checkMultipart(request);
                multipartRequestParsed = (processedRequest != request);

                // Determine handler for the current request.
                // 5. 적절하게 처리할 handler를 찾는다. 만약 찾았다면 rendering을 위한 handler와 interceptor가 실행이 됩니다.
                mappedHandler = getHandler(processedRequest);
                if (mappedHandler == null) {
                    noHandlerFound(processedRequest, response);
                    return;
                }

                // Determine handler adapter for the current request.
                // Handler를 찾은 것은 실제로 실행시켜줄 Adapter에 매핑시킨다.
                HandlerAdapter ha = getHandlerAdapter(mappedHandler.getHandler());

                // Process last-modified header, if supported by the handler.
                // resource cache를 체크한다.
                String method = request.getMethod();
                boolean isGet = "GET".equals(method);
                if (isGet || "HEAD".equals(method)) {
                    long lastModified = ha.getLastModified(request, mappedHandler.getHandler());
                    if (new ServletWebRequest(request, response).checkNotModified(lastModified) && isGet) {
                        return;
                    }
                }

                if (!mappedHandler.applyPreHandle(processedRequest, response)) {
                    return;
                }

                // Actually invoke the handler.
                // 실제로 실행되어 진다.
                mv = ha.handle(processedRequest, response, mappedHandler.getHandler());

                if (asyncManager.isConcurrentHandlingStarted()) {
                    return;
                }

                // 6. view를 찾고 model을 매핑한다.
                applyDefaultViewName(processedRequest, mv);
                mappedHandler.applyPostHandle(processedRequest, response, mv);
            }
            catch (Exception ex) {
                dispatchException = ex;
            }
            catch (Throwable err) {
                // As of 4.3, we're processing Errors thrown from handler methods as well,
                // making them available for @ExceptionHandler methods and other scenarios.
                dispatchException = new NestedServletException("Handler dispatch failed", err);
            }
            // 6. rendering을 진행하고 결과값을 response에 넣는다.
            processDispatchResult(processedRequest, response, mappedHandler, mv, dispatchException);
        }
        catch (Exception ex) {
            triggerAfterCompletion(processedRequest, response, mappedHandler, ex);
        }
        catch (Throwable err) {
            triggerAfterCompletion(processedRequest, response, mappedHandler,
                    new NestedServletException("Handler processing failed", err));
        }
        finally {
            if (asyncManager.isConcurrentHandlingStarted()) {
                // Instead of postHandle and afterCompletion
                if (mappedHandler != null) {
                    mappedHandler.applyAfterConcurrentHandlingStarted(processedRequest, response);
                }
            }
            else {
                // Clean up any resources used by a multipart request.
                if (multipartRequestParsed) {
                    cleanupMultipart(processedRequest);
                }
            }
        }
    }
마무리
이렇게 해서 docs에 있는 flow가 실제 코드로는 어떻게 구현되어있는지 한번 찾아보는시간을 가졌습니다. 더 디테일하게 분석하고 싶은 마음은 굴뚝같지만 실제로 하는일도있고.... 다른 포스팅 욕심도 나고 해서..... 뭐 그렇습니다. 요즘은 Spring Boot와 ethereum Client에 관심을 계속 가지고 있고 이와 관련된 Reference를 읽고있습니다. 또 공유하고 싶은 내용, 알면 좋을것 같은 내용이 있으면 새로운 포스팅으로 찾아뵙겠습니다.
감사합니다.
참고
https://docs.spring.io/spring/docs/5.1.9.RELEASE/spring-framework-reference/web.html#mvc
'language, framework, library > Spring' 카테고리의 다른 글
| [Spring] Spring의 IoC/DI Container (0) | 2020.03.21 |
|---|---|
| [Spring] Spring의 핵심 기술 IoC / DI (0) | 2020.03.02 |
| [Spring] Spring의 정의와 기본 개념 (2) | 2020.02.21 |
| [Spring Boot] Spring Boot Actuator, Application을 모니터링 하자 (0) | 2019.09.14 |
| [Spring Boot] Session과 Cache의 기본 저장소 ! (1) | 2019.09.10 |


댓글